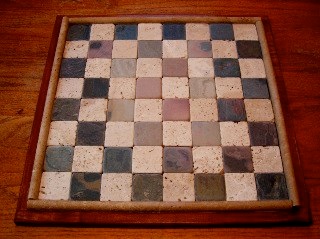
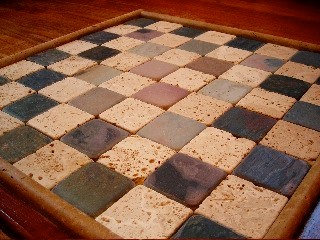
I am not the handiest person, but I like to putter around, and recently, while thinking about slate roofs, I got an idea for a chess board made with slate squares. I couldn’t find any stone squares of the right size on the Web, but while wandering around Lowe’s, I stumbled into the tile department and there were small slate squares, glued to mesh for use in making back-splashes above tile counters. The squares come in sheets of 36; I bought two sheets of the slate squares so I’d have enough squares to choose from, and one sheet of ivory-colored marble squares for contrast. They’re about $10 a sheet. I also found eight “pencils,” rounded stone borders to use around the edge; they were $2.50 each. I bought some birch plywood in another aisle, and some wood trim, for the base.
At home, I took the squares off the mesh/glue backing (with my fingers and a needle-nose pliers) and sanded all the edges and bottoms with heavy grit sandpaper to get the small stuff. I picked the best looking 32 slate and marble squares, 64 total, and laid the board out with the trim, so I could measure exactly for the base.
Fortunately, I have friends who can cut the base and trim to the right lengths, after I’ve done the measuring. (The cuts are even and I still have all my fingers.) If you have a miter saw, you can do nice angled corners for the trim, as with a picture frame. If not, you can lay it out as I did, keeping it simple, with each piece of trim cut square. I cut them all to the same length: each one the length of the edge less the width of the trim. You could cut two short and two long, and do it that way as well.
Next, I wood-glued and nailed the trim to the board, stained the trim and the edges, and hit the trim, the edges and the back of the board with clear polyurethane. You can use any color stain, oil- or water-based. I prefer the water-based since it cleans up so easily. Lowe’s has all that stuff, too. I apply the stain to the edges with an old t-shirt; for the poly, I use a brush, although you can find a wipe-on poly as well.
I ended up using a premium wood glue for the squares; the epoxy options all seemed so toxic and unforgiving, and since no one is going to be walking on this, or holding it upside down, I figured the wood glue would be good enough. So far, it has been. The squares are nice and snug. The glue did bubble up after about 10 minutes, and afterwards I had to do a lot of cleaning, going after the dried glue with a dental pick and fine sandpaper.
You could use a stone sealer, if you want a gloss finish, but I’m leaving the stone natural. I’m still thinking of ways to buff it smooth, but I’m happy with the way it turned out. When you wipe it with a damp cloth, it smells like a blackboard, which is kind of a nice memory. I spent less than $100, and I had a lot of fun.
One caution: The finished board is heavy; it’s not for travel. And put some little glue-on feet or felt pads on the bottom to spare your tabletops.


Thanks for this! That is a very good looking board. I am going to try and do the same thing! What kind of pieces did you use on this board?
Josh, I’m glad you like it. I have an Isle of Lewis chess set, in resin, that seems perfectly at home on this board.
Isle of Lewis replicas in resin.
This is one of the most beautiful things I have ever seen!! Can you link me what tiles you got in Lowe’s?! Thanks!!
All I can tell you is that I got them in the tile aisle, backsplash section (i.e., tile for above countertops, stoves, etc.) and they came in sheets, glued on to mesh. I used marble and slate. And having said that, here they are on the Web:
http://www.lowes.com/pd_72126-93840-LW419_4294735483%2B4294760043__?productId=3109543&Ns=p_product_qty_sales_dollar|1&pl=1¤tURL=%3FNs%3Dp_product_qty_sales_dollar|1&facetInfo=Natural%20stone
http://www.lowes.com/pd_95152-93840-LW403_4294735483%2B4294760043__?productId=3110067&Ns=p_product_qty_sales_dollar|1&pl=1¤tURL=%3FNs%3Dp_product_qty_sales_dollar|1&facetInfo=Natural%20stone
You might want to see them “in person” to be sure the squares are the same size.
I read with interest your chessboard experience. I have the Lewis set too and came to the conclusion the squares had to be 2 inches to accommodate the bigger pieces. I checked out the tile link and the current tile sheet offered (same size, less than a foot square) and concluded that your method wouldn’t work for me. Perhaps your chessmen are just a bot smaller. I did get inspired to try
creating my own version, thanks. I had a polished stone version but the squares were just a bit small and later on i dropped it and it broke in two.
Lovely, I have made a similar board my self using glass tiles from mosaic splash backs. Adore the earthy feel of your board. Marble and slate it reminds me of my old and fav kitchen, might have to copy!
I did the same thing. However I used ceramic tile..an ivory and a charcoal. Used red oak for the base and border. Made one with a natural finish and one with an Espresso finish. Then topped it with Super Glaze epoxy resin. Heavy as shit! But looks awesome!
Cool! And yes, I didn’t think about how much it would weigh…